Thursday 15 November 2012

How to add script in SharePoint web part


Add the script in webpart.cs file.     

 private const string EmbeddedScriptFormat = "<script language=\"javascript\">$(document).ready( function(){alert('hi');});</script>";

        //TESTWEBPART() is the default constructor name of the webpart class
public TESTWEBPART() { this.PreRender += new EventHandler(WebPart_ClientScript_PreRender); }

private void WebPart_ClientScript_PreRender(object sender, System.EventArgs e) { if (!Page.IsClientScriptBlockRegistered(ByeByeIncludeScriptKey)) Page.RegisterClientScriptBlock(ByeByeIncludeScriptKey, EmbeddedScriptFormat); }

ListViewByQuery control sorting,grouping,filtering,


Introduction

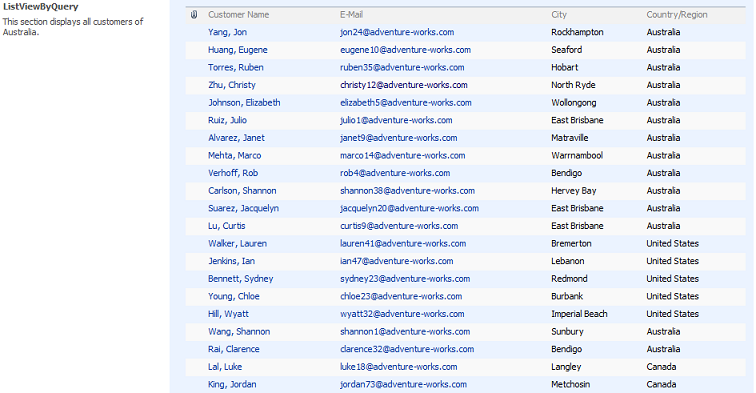
The ListViewByQuery control renders a list view on an application page or within a web part based on a specified query.
listviewbyquery
When the control is displayed users can sort on the columns of the list view and apply filters. But all these events need to be implemented by you otherwise the rendering will fail with an ugly error.

Syntax

The ListViewByQuery control  is part of the Microsoft.SharePoint.dll and is located in theMicrosoft.SharePoint.WebControls namespace. You can use this control declaratively when developing application pages or control templates:
<spuc:ListViewByQuery ID="CustomersListViewByQuery" runat="server" Width="700px" />
But there is a caveat: the properties List and Query only accept objects and cannot be set declaratively, only in code.
Don’t forget to add a directive at the top of the application page or control template:
<%@ Register TagPrefix="spuc" Namespace="Microsoft.SharePoint.WebControls"
             Assembly="Microsoft.SharePoint, Version=12.0.0.0, Culture=neutral, PublicKeyToken=71e9bce111e9429c" %>
If your are developing a web part you have to create the ListViewByQuery control completely in code:
private ListViewByQuery CustomersListViewByQuery;
private void EnsureChildControls()
{
     CustomersListViewByQuery = new ListViewByQuery();
     // The rest of the code follows here....
}
There are two mandatory properties that need to be set: the List property which is of type SPList and the Query property which is of type SPQuery. The OnLoad event handler or the EnsureChildControls method then contains following code:
list = SPContext.Current.Web.Lists["Customers"];
CustomersListViewByQuery.List = list;
string query = null;
if (!Page.IsPostBack)
{
    query = "<OrderBy><FieldRef Name='Title' Ascending='true' /></OrderBy>";
}
else
{
    // apply filtering and/or sorting
}
SPQuery qry = new SPQuery(list.DefaultView);
qry.Query = query;
CustomersListViewByQuery.Query = qry;
The query object must be instantiated based on an existing view of the list otherwise theListViewByQuery control will not work. The data displayed by the control is determined by the CAML query itself.
You can limit the number of rows returned by setting the RowLimit property of the SPQueryobject:
qry.RowLimit = 50;
This was the easy part but it becomes more complex when you need to implement sorting and filtering. When the user chooses to sort or to filter, the page is posted back with some extra information stored in the HttpRequest object.

Sorting

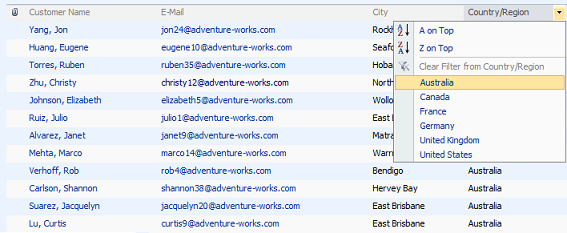
The user can decide to sort on a certain column by clicking the column header and choosing A on Top or Z on Top.
listviewbyquery-sort2
This instructs the page to post back, and the selected column and sort order is passed to the server stored into the Context.Request["SortField"]  and theContext.Request["SortDir"]. Following code sample calls the BuildSortOrder method and passes both constructs the <OrderBy> clause based on both request values.
if (!Page.IsPostBack)
{
    query = "<Query><OrderBy><FieldRef Name='Title' Ascending='true' /></OrderBy></Query>";
}
else
{
    // apply filtering and/or sorting
   if (this.Context.Request != null && this.Context.Request["SortField"] != null)
   {
       string sortorder = BuildSortOrder(this.Context.Request["SortField"],
           (this.Context.Request["SortDir"] == "Asc" ? "true" : "false"));
       if (string.IsNullOrEmpty(query))
           query = sortorder;
       else
           query += sortorder;
   }
}
Following code sample constructs the <OrderBy> clause based on both request values:
private string BuildSortOrder(string fieldName, string sortOrder)
{
    string query = null;
    if (!string.IsNullOrEmpty(fieldName))
    {
        query = string.Format("<OrderBy><FieldRef Name='{0}' Ascending='{1}' /></OrderBy>", fieldName, sortOrder);
    }           
    return query;
}

Filtering

The user can also filter the data in the ListViewByQuery control. When the different values in one of the columns is not a large set of data, the user can select from a list of distinct values.
 listviewbyquery-filter
When the page is posting back after the user action, the selected field is stored in the Context.Request["FilterField1"] and the selected value is stored in the Context.Request["FilterValue1"]. If more than 1 filter criteria is specified by the user (by selecting a value of a second column) key/value pairs are added with FilterField2 and FilterValue2 as key, and so on.
Constructing the Where clause of a CAML query is not that easy. I give you the code sample to give you an idea on how you can proceed:
private string BuildFilter()
{
    string query = "{0}";
    bool isFound = true;
    int counter = 1;
    while (isFound)
    {
          string filterfield = "FilterField" + counter.ToString();
          string filtervalue = "FilterValue" + counter.ToString();
          if (this.Context.Request[filterfield] != null && this.Context.Request[filtervalue] != null)
          {
               // Field type must be treated differently in case of other data type
               if (counter > 1)
                   query = "<And>" + query + "{0}</And>";
               query = string.Format(query, string.Format("<Eq><FieldRef Name='{0}' /><Value Type='Text'>{1}</Value></Eq>",
                       this.Context.Request[filterfield], this.Context.Request[filtervalue]));
               counter++;
          }
          else
          {
               isFound = false;
          }
    }
    if (!string.IsNullOrEmpty(query))
       query = "<Where>" + query + "</Where>";
    return query;
}
As one of my readers pointed out, this code snippet only works for text fields. If you want to filter on other types of fields, like number fields, choice fields or lookups, you will have to change the Type attribute from the Value element into the correct type.  To get hold on the field type, you will have to retrieve the field from the list.
SPField field = list.Fields[filterfield];
And change the query statement accordingly:
query = string.Format(query, string.Format("<Eq><FieldRef Name='{0}' /><Value Type='{1}'>{2}</Value></Eq>",
                       this.Context.Request[filterfield], field.TypeAsString, this.Context.Request[filtervalue]));

Grouping

With the ListViewByQuery control you can also build a view where the data is grouped. In that case you have to use the CAML GroupBy element:
query = "<GroupBy Collapse='FALSE'><FieldRef Name='CountryRegionName' /><FieldRef Name='City' /></GroupBy>";
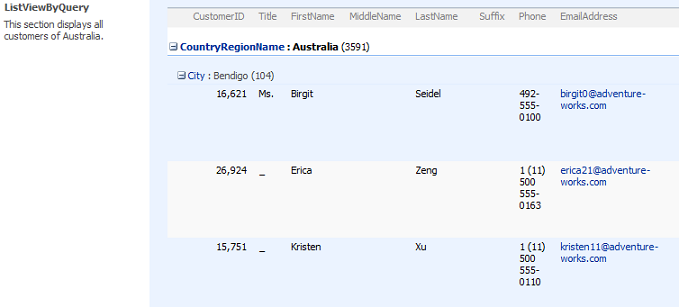
This sample code groups the data by the CountryRegionName and then by City. You can specify more than one group by criterium but the choice of showing the groups collapsed or expanded must be set for all groups by using the Collapse attribute of the GroupBy element.
listviewbyquery-expanded
Use the + and - signs to expand and collapse the different groups.
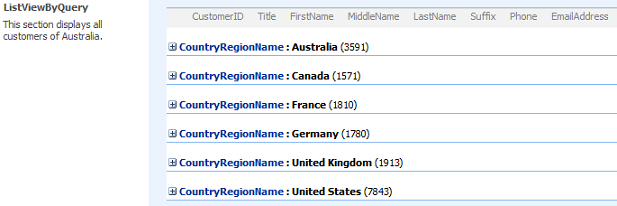
If you decide to show the groups expanded, you set the Collapse attribute to TRUE and you get the following view:
listviewbyquery-collapsed
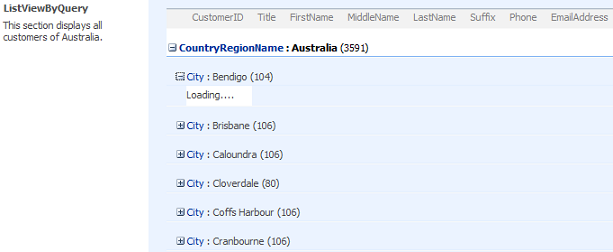
But then there is a small problem: you can expand all groups, except the latest one: it shows a Loading label but nevers shows the data.
listviewbyquery-collapsed-expanding
When taking a look at the rendered HTML you can see that all of the hyperlinks that have to do with the ListViewByQuery contain a call to the ExpCollGroup javascript call, which is a function in one of the javascript files that come with SharePoint.
Thanks to one of my readers, Alex, we can now solve this problem with a small piece of javascript. First set the Collapse attribute to FALSE and place your ListViewByQuery control in a DIV and give this DIV an ID. Immediately after the DIV  add the following javascript: 
<div id="ViewDiv" class="ms-authoringcontrols" style="width:700px">
     <spuc:ListViewByQuery ID="CustomersListViewByQuery" runat="server" Width="700px" />
</div>
<script language="javascript">
   $(document).ready( function(){
$(‘#viewDiv’).find(‘a[onclick*=ExpCollGroup]:even’).each(
function(){
this.onclick();
}
);
});
</script>   


for web part add below code to the webpart_name.cs file:

 private const string ByeByeIncludeScriptKey = "myByeByeIncludeScript";


        private const string EmbeddedScriptFormat = "<script language=\"javascript\">$(document).ready( function(){$('#ViewDiv').find('a[onclick*=ExpCollGroup]:even').each(function(){this.onclick();});});</script>";


        public TESTWEBPART()
        {
            this.PreRender += new EventHandler(WebPart_ClientScript_PreRender);
        }
        private void WebPart_ClientScript_PreRender(object sender, System.EventArgs e)
        {
            if (!Page.IsClientScriptBlockRegistered(ByeByeIncludeScriptKey))
                Page.RegisterClientScriptBlock(ByeByeIncludeScriptKey,
                EmbeddedScriptFormat);

        }

  
The ListViewByQuery control loads with all groups expanded but when it is rendered to the page, the click method is executed on all hyperlinks that have a call to  ExpCollGroup in their href attribute.

Friday 12 October 2012

Export to Excel in Sharepoint 2010 ribbon( with selected items)


In SharePoint 2010, sites can export custom list items to Excel using the Export to Excel option in the ribbon toolbar. It will export all items in that particular view in which the option is invoked. SharePoint literally is notexporting the items it creates in the query file instead, which will have the view id and helps to query theSharePoint list data and the results are shown in the excel spreadsheet.
Now if I have a requirement something like, I need to export only specific items from the list. Let's say I want toexport only 10 items out of 30 items shown in the view then there is no direct option for that. I need to create a view and apply filter to extract only the specific 10 items which I want to export. But I can' t create views every time to export any specific items. What if I don't have appropriate permissions to create views? To overcome these kind of issues, I have created a component which will export the specific items from the custom list. Its a custom action which will create the "Export to excel" ribbon button. Just selected the items and click on the button in the ribbon to export the items.

How To

  1. Deploy the WSP to the concerned web application
  2. Go to site features and activate the feature
  3. Use the export functionality in the custom list

Download code here Here


Referred from  Here

Export to Excel in SharePoint 2010


Export to Excel in SharePoint 2010

private DataTable  SearchItem()
    {
        DataTable dt = new DataTable();
        SPSecurity.RunWithElevatedPrivileges(delegate
        {
            SPList list = SPContext.Current.Web.Lists["TestList"];
           
         
            string query = null;
            SPQuery qry = new SPQuery(list.DefaultView);
            //SPListItemCollection lstColl =
            int iCnt = 0;
            try
            {

                qry.ViewFields = "<FieldRef Name='LinkTitleNoMenu' /><FieldRef Name='TestColumn' />";
                    qry.Query = query;                  
                dt= list.GetItems(qry).GetDataTable();                

                   
                }

            catch (Exception ex) { Response.Write(ex.Message); }
        });
        return dt;
    }


 private void ExportToExcel1()
    {
        DataTable dt1 = SearchItem();


        gvdetails.DataSource = dt1;
        gvdetails.DataBind();

        Response.Clear();
        Response.Buffer = true;
        Response.AddHeader("content-disposition", "attachment;filename=ExcelReport.xls");
        Response.Charset = "";
        Response.ContentType = "application/vnd.ms-excel";
        StringWriter sw = new StringWriter();
        HtmlTextWriter hw = new HtmlTextWriter(sw);


        gvdetails.RenderControl(hw);
        Response.Output.Write(sw.ToString());
        Response.Flush();
        Response.End();

    }

 
    public override void VerifyRenderingInServerForm(Control control)
    {

    }


<asp:GridView runat="server" ID="gvdetails"    Width="100%" AllowPaging="false" PageSize="1000" AllowSorting="false">
<RowStyle BackColor="#EFF3FB" />
<FooterStyle BackColor="#507CD1" Font-Bold="True" ForeColor="White" />
<PagerStyle BackColor="#2461BF" ForeColor="White" HorizontalAlign="Center" />
<HeaderStyle BackColor="#507CD1" Font-Bold="True" ForeColor="Black" />
<AlternatingRowStyle BackColor="White" />

</asp:GridView>

Add script to placeholdermain


 <script type="text/javascript">

            _spOriginalFormAction = document.forms[0].action;

            _spSuppressFormOnSubmitWrapper = true;

</script>


Ecma to GetListItem and fill in dropdown


<script type=”text/ecmascript” language=”ecmascript”>
   
    ExecuteOrDelayUntilScriptLoaded(retrieveListItems, "sp.js");
    var ItemContainer = { ItemList: [] };

   function retrieveListItems() {

        var clientContext = SP.ClientContext.get_current();
        // Get the SharePoint list by giving the display name of the list.
        var oList = clientContext.get_web().get_lists().getByTitle(‘Categories’);
        // To retreive all items use the predefined createAllItemsQuery operation.
        var camlQuery = SP.CamlQuery.createAllItemsQuery();
        this.collListItem = oList.getItems(camlQuery);
        clientContext.load(collListItem);
        clientContext.executeQueryAsync(
            Function.createDelegate(this, this.onListDataLoadQuerySucceeded),
            Function.createDelegate(this, this.onListDataLoadQueryFailed));
    }


 // Callback function if the item retrieval Async call get successful.
    function onListDataLoadQuerySucceeded(sender, args) {
        var listItemInfo = ”;
        var listItemEnumerator = collListItem.getEnumerator();
        while (listItemEnumerator.moveNext()) {
            var oListItem = listItemEnumerator.get_current();
            // Fill a json object with Id and Value properties.
            var tempItem = { Id: oListItem.get_id(), Value: oListItem.get_item(‘Title’) };
            ItemContainer.ItemList.push(tempItem);
        }
        // Fill the drop down with retrieved data.
        fillDropDown();
    }
    // Callback function if item retrieval failes.
    function onListDataLoadQueryFailed(sender, args) {
        alert(‘Request failed. ‘ + args.get_message() + ‘\n’ + args.get_stackTrace());
    }


 // Fill  the drop down with the retrieved list item data.
    function fillDropDown() {
        var ddlCategory = document.getElementById(‘ddlCategory’);
        if (ddlCategory != null) {
            for (var i = 0; i < ItemContainer.ItemList.length; i++) {
                var theOption = new Option;
                theOption.value = ItemContainer.ItemList[i].Id;
                theOption.text = ItemContainer.ItemList[i].Value;
                ddlCategory.options[i] = theOption;
            }
        }
    }


</script>

Rdlc in sharepoint

http://sharepointtaskmaster.blogspot.in/2010/11/intergration-reporting-service-with.html

Get list item count in Ecma script


   var selectedItems = SP.ListOperation.Selection.getSelectedItems();
   var ci2 = CountDictionary(selectedItems);

Thursday 11 October 2012

Custom action in SharePoint 2010 with multiple groups , control and enable/disable the custom action


My Custom Action with one custom group and multiple controls


<?xml version="1.0" encoding="utf-8"?>
<Elements xmlns="http://schemas.microsoft.com/sharepoint/">
  <CustomAction
    Id="Ribbon.ListForm.Display.Reservations.ReturnCustomAction"
    RegistrationId="106"
    RegistrationType="List"
    Location="CommandUI.Ribbon.DisplayForm"
    Title="Custom Action"
    GroupId="Appointment">
    <CommandUIExtension>
      <CommandUIDefinitions>

        <CommandUIDefinition Location="Ribbon.Templates._children">
          <GroupTemplate Id="Reservations.Templates">
            <Layout Title="Large">
              <Section Type="OneRow">
                <Row>
                  <ControlRef TemplateAlias="c1" DisplayMode="Large" />
                  <ControlRef TemplateAlias="c2" DisplayMode="Large" />
                </Row>
              </Section>
            </Layout>
          </GroupTemplate>
        </CommandUIDefinition>
        <CommandUIDefinition Location="Ribbon.ListForm.Display.Scaling._children">
          <MaxSize Id="Ribbon.ListForm.Display.CustomActionGroup.MaxSize"
                   Sequence="55"
                   GroupId="Ribbon.ListForm.Display.CustomActionGroup"
                   Size="Large" />
        </CommandUIDefinition>
        <CommandUIDefinition Location="Ribbon.ListForm.Display.Groups._children">
          <Group Id="Ribbon.ListForm.Display.CustomActionGroup"
                 Sequence="155"
                 Description="Custom Action"
                 Title="Custom Action"
                 Template="Reservations.Templates">
            <Controls Id="Ribbon.ListForm.Display.CustomActionGroup.Controls">
              <Button Id="Ribbon.ListForm.Display.CustomActionGroup.Reservations.Return"
          Command="{4E2F5DC0-FE2C-4466-BB2D-3ED0D1917763}"
          Image32by32="~site/Style Library/app32.jpg"
          Image16by16="~site/Style Library/app16.jpg"
          Sequence="56"
          LabelText="Book an Appointment"
          Description="Book an Appointment"
          TemplateAlias="c1"/>
              <Button Id="Ribbon.ListForm.Display.CustomActionGroup.Reservations.NoShow"
           Command="NoShow"
           Image32by32="~site/Style Library/noshow32.jpg"
           Image16by16="~site/Style Library/noshow16.jpg"
           Sequence="76"
           LabelText="No Show"
           Description="No Show"
           TemplateAlias="c2"/>
           
            </Controls>
          </Group>
        </CommandUIDefinition>
       
      </CommandUIDefinitions>
      <CommandUIHandlers>       
        <CommandUIHandler Command="{4E2F5DC0-FE2C-4466-BB2D-3ED0D1917763}" CommandAction="javascript:
                             var options = SP.UI.$create_DialogOptions();
                             options.url = '/Lists/Appointment/BookAnAppointMent.aspx?ID={ItemId}',                            
                             options.width = 700;
                             options.height = 700;
                             options.dialogReturnValueCallback=DialogCallback;
                             SP.UI.ModalDialog.showModalDialog(options);" EnabledScript="javascript:SingleEnable('All',SP.PermissionKind.editListItems);" />
        <CommandUIHandler Command="NoShow" CommandAction="javascript:
                             var options = SP.UI.$create_DialogOptions();
                             options.url = '/Lists/Appointment/NoShow.aspx?ID={ItemId}',                             
                             options.width = 700;
                             options.height = 700;
                             options.dialogReturnValueCallback=DialogCallback;
                             SP.UI.ModalDialog.showModalDialog(options);" EnabledScript="javascript:NoShowEnable('All',SP.PermissionKind.editListItems);" />
      </CommandUIHandlers>
    </CommandUIExtension>
  </CustomAction>

 
</Elements>


 Script on page to  enable/disable the custom action
<script type="text/javascript">

ExecuteOrDelayUntilScriptLoaded(SingleEnable"sp.js");
function SingleEnable(EnableForStatusPermissionKind) {

   var result false;

   var selectedItems SP.ListOperation.Selection.getSelectedItems();
   var ci2 CountDictionary(selectedItems);
   if (ci2 == 1) {
       result true;
   }
   else
   { result false;
}

   return result;
}
</script>


Custom action with multiple tabs and multiple groups with multiple buttons


: <?xml version="1.0" encoding="utf-8"?>
   2: <Elements xmlns="http://schemas.microsoft.com/sharepoint/">
   3:   <CustomAction
   4:       Id="COB.SharePoint.Ribbon.CustomTab"
   5:       Location="CommandUI.Ribbon"
   6:       RegistrationType="List"
   7:       RegistrationId="101">
   8:     <CommandUIExtension>
   9:       <CommandUIDefinitions>
  10:         <CommandUIDefinition Location="Ribbon.Tabs._children">
  11:           <Tab Id="COB.SharePoint.Ribbon.CustomTab"
  12:                Title="Chris's custom tab"
  13:                Description="Groups and controls will go in here"
  14:                Sequence="550">
  15:             <Scaling Id="COB.SharePoint.Ribbon.CustomTab.Scaling">
  16:               <MaxSize Id="COB.SharePoint.Ribbon.CustomTab.NotificationGroup.MaxSize"
  17:                        GroupId="COB.SharePoint.Ribbon.CustomTab.NotificationGroup"
  18:                        Size="OneLarge"/>
  19:               <MaxSize Id="COB.SharePoint.Ribbon.CustomTab.StatusGroup.MaxSize"
  20:                        GroupId="COB.SharePoint.Ribbon.CustomTab.StatusGroup"
  21:                        Size="TwoMedium"/>
  22:               <MaxSize Id="COB.SharePoint.Ribbon.CustomTab.RemoveStatusGroup.MaxSize"
  23:                        GroupId="COB.SharePoint.Ribbon.CustomTab.RemoveStatusGroup"
  24:                        Size="TwoLarge"/>
  25:               <Scale Id="COB.SharePoint.Ribbon.CustomTab.NotificationGroup.Scaling.CustomTabScaling"
  26:                      GroupId="COB.SharePoint.Ribbon.CustomTab.NotificationGroup"
  27:                      Size="OneLarge" />
  28:               <Scale Id="COB.SharePoint.Ribbon.CustomTab.StatusGroup.Scaling.CustomTabScaling"
  29:                      GroupId="COB.SharePoint.Ribbon.CustomTab.StatusGroup"
  30:                      Size="TwoMedium" />
  31:               <Scale Id="COB.SharePoint.Ribbon.CustomTab.RemoveStatusGroup.Scaling.CustomTabScaling"
  32:                      GroupId="COB.SharePoint.Ribbon.CustomTab.RemoveStatusGroup"
  33:                      Size="TwoLarge" />
  34:             </Scaling>
  35:             <Groups Id="COB.SharePoint.Ribbon.CustomTab.Groups">
  36:               <Group
  37:                 Id="COB.SharePoint.Ribbon.CustomTab.NotificationGroup"
  38:                 Description="Contains notification items"
  39:                 Title="Notification messages"
  40:                 Sequence="10"
  41:                 Template="Ribbon.Templates.OneLargeExample">
  42:                 <Controls Id="COB.SharePoint.Ribbon.CustomTab.NotificationGroup.Controls">
  43:                   <Button
  44:                     Id="COB.SharePoint.Ribbon.CustomTab.NotificationGroup.Notify"
  45:                     Command="COB.Command.Notify"
  46:                     Sequence="10"
  47:                     Image16by16="/_layouts/images/NoteBoard_16x16.png"
  48:                     Image32by32="/_layouts/images/NoteBoard_32x32.png"
  49:                     Description="Uses the notification area to display a message."
  50:                     LabelText="Notify hello"
  51:                     TemplateAlias="cust1"/>
  52:                 </Controls>
  53:               </Group>
  54:               <Group
  55:                 Id="COB.SharePoint.Ribbon.CustomTab.StatusGroup"
  56:                 Description="Contains 'add status' items"
  57:                 Title="Add status messages"
  58:                 Sequence="20"
  59:                 Template="Ribbon.Templates.TwoMediumExample">
  60:                 <Controls Id="COB.SharePoint.Ribbon.CustomTab.StatusGroup.Controls">
  61:                   <Button
  62:                     Id="COB.SharePoint.Ribbon.CustomTab.StatusGroup.AddStatusInfo"
  63:                     Command="COB.Command.AddStatusInfo"
  64:                     Sequence="10"
  65:                     Image16by16="/_layouts/images/info16by16.gif"
  66:                     Image32by32="/_layouts/images/info16by16.gif"
  67:                     Description="Uses the status bar to display an info message."
  68:                     LabelText="Info status"
  69:                     TemplateAlias="cust2"/>
  70:                   <Button
  71:                     Id="COB.SharePoint.Ribbon.CustomTab.StatusGroup.AddStatusWarning"
  72:                     Command="COB.Command.AddStatusWarn"
  73:                     Sequence="20"
  74:                     Image16by16="/_layouts/images/warning16by16.gif"
  75:                     Image32by32="/_layouts/images/warning32by32.gif"
  76:                     Description="Uses the status bar to display a warning message."
  77:                     LabelText="Warning status"
  78:                     TemplateAlias="cust3"/>
  79:                 </Controls>
  80:               </Group>
  81:               <Group
  82:                   Id="COB.SharePoint.Ribbon.CustomTab.RemoveStatusGroup"
  83:                   Description="Contains 'remove status' items"
  84:                   Title="Remove status messages"
  85:                   Sequence="30"
  86:                   Template="Ribbon.Templates.TwoLargeExample">
  87:                 <Controls Id="COB.SharePoint.Ribbon.CustomTab.RemoveStatusGroup.Controls">
  88:                   <Button
  89:                     Id="COB.SharePoint.Ribbon.CustomTab.RemoveStatusGroup.RemoveLastStatusButton"
  90:                     Command="COB.Command.RemoveLastStatus"
  91:                     Sequence="10"
  92:                     Image16by16="/_layouts/images/warning16by16.gif"
  93:                     Image32by32="/_layouts/images/CRIT_32.GIF"
  94:                     Description="Removes the last message from the status bar."
  95:                     LabelText="Remove last status message"
  96:                     TemplateAlias="cust4"/>
  97:                   <Button
  98:                     Id="COB.SharePoint.Ribbon.CustomTab.RemoveStatusGroup.RemoveAllStatusButton"
  99:                     Command="COB.Command.RemoveAllStatus"
 100:                     Sequence="20"
 101:                     Image16by16="/_layouts/images/warning16by16.gif"
 102:                     Image32by32="/_layouts/images/CRIT_32.GIF"
 103:                     Description="Removes all messages from the status bar."
 104:                     LabelText="Remove all status messages"
 105:                     TemplateAlias="cust5"/>
 106:                 </Controls>
 107:               </Group>
 108:             </Groups>
 109:           </Tab>
 110:         </CommandUIDefinition>
 111:         <CommandUIDefinition Location="Ribbon.Templates._children">
 112:           <GroupTemplate Id="Ribbon.Templates.OneLargeExample">
 113:             <Layout Title="OneLarge" LayoutTitle="OneLarge">
 114:               <Section Alignment="Top" Type="OneRow">
 115:                 <Row>
 116:                   <ControlRef DisplayMode="Large" TemplateAlias="cust1" />
 117:                 </Row>
 118:               </Section>
 119:             </Layout>
 120:           </GroupTemplate>
 121:         </CommandUIDefinition>
 122:         <CommandUIDefinition Location="Ribbon.Templates._children">
 123:           <GroupTemplate Id="Ribbon.Templates.TwoMediumExample">
 124:             <Layout Title="TwoMedium" LayoutTitle="TwoMedium">
 125:               <Section Alignment="Top" Type="TwoRow">
 126:                 <Row>
 127:                   <ControlRef DisplayMode="Medium" TemplateAlias="cust2" />
 128:                 </Row>
 129:                 <Row>
 130:                   <ControlRef DisplayMode="Medium" TemplateAlias="cust3" />
 131:                 </Row>
 132:               </Section>
 133:             </Layout>
 134:           </GroupTemplate>
 135:         </CommandUIDefinition>
 136:         <CommandUIDefinition Location="Ribbon.Templates._children">
 137:           <GroupTemplate Id="Ribbon.Templates.TwoLargeExample">
 138:             <Layout Title="TwoLarge" LayoutTitle="TwoLarge">
 139:               <Section Alignment="Top" Type="OneRow">
 140:                 <Row>
 141:                   <ControlRef DisplayMode="Large" TemplateAlias="cust4" />
 142:                   <ControlRef DisplayMode="Large" TemplateAlias="cust5" />
 143:                 </Row>
 144:               </Section>
 145:             </Layout>
 146:           </GroupTemplate>
 147:         </CommandUIDefinition>
 148:       </CommandUIDefinitions>
 149:       <CommandUIHandlers>
 150:         <CommandUIHandler
 151:             Command="COB.Command.Notify"
 152:             CommandAction="javascript: var notificationId = SP.UI.Notify.addNotification('Hello from the notification area'); " />
 153:         <CommandUIHandler
 154:             Command="COB.Command.AddStatusInfo"
 155:             CommandAction="javascript:                   
 156:               var statusId = SP.UI.Status.addStatus('Quite important status message');        
 157:               visibleStatusIds.push(statusId);
 158:               enableRemoveStatusButton();
 159:               RefreshCommandUI();" />
 160:         <CommandUIHandler
 161:             Command="COB.Command.AddStatusWarn"
 162:             CommandAction="javascript:
 163:               var warnStatusId = SP.UI.Status.addStatus('Very important status message');
 164:               SP.UI.Status.setStatusPriColor(warnStatusId, 'red');  
 165:               visibleStatusIds.push(warnStatusId);
 166:               enableRemoveStatusButton();
 167:               RefreshCommandUI(); " />
 168:         <CommandUIHandler
 169:             Command="COB.Command.RemoveLastStatus"
 170:             EnabledScript="javascript: enableRemoveStatusButton();"
 171:             CommandAction="javascript:            
 172:               SP.UI.Status.removeStatus(visibleStatusIds[visibleStatusIds.length - 1]);  
 173:               visibleStatusIds.pop();
 174:               enableRemoveStatusButton();
 175:               RefreshCommandUI();" />
 176:         <CommandUIHandler
 177:             Command="COB.Command.RemoveAllStatus"
 178:             EnabledScript="javascript: enableRemoveStatusButton();"
 179:             CommandAction="javascript:          
 180:               SP.UI.Status.removeAllStatus(true);       
 181:               visibleStatusIds.length = 0;
 182:               enableRemoveStatusButton();
 183:               RefreshCommandUI();" />
 184:       </CommandUIHandlers>
 185:     </CommandUIExtension>
 186:   </CustomAction>
 187:   <CustomAction
 188:     Id="COB.Command.RemoveLastStatus.CheckEnable" Location="ScriptLink"
 189:     ScriptBlock="         
 190:       var visibleStatusIds = [];                          
 191:       function enableRemoveStatusButton()  {  
 192:           return (visibleStatusIds.length > 0);       
 193:       }" />
 194: </Elements>


Referred Areas :


Architecture of ribbon

Modifying Custom Action On Ribbon(Create new tab etc) 

How to create custom action

Custom action action id’s

Enable scripts