The data that is used here is stored in a Pages library for a News site, which of course is just a list. Through Item Styles used by the CQWP, I can control the display of the data nearly any way I wish.
Creating the Custom Item Style
First, hands down this is a fantastic blog post to read on the subject: Configuring and Customizing the Content Query Web Part on the ECM Blog. That post is what I followed to create custom Item Styles. This article is just to help fill in the blanks on how to use this process for your own site.
I am going to breeze through some of the steps that are documented on the ECM blog, and go into others in more detail that are not documented in that post.
Add a CQWP To The Site
- Add a Content Query Web Part to a page in the site. By default the CQWP will display all of the pages in the site.
- Now choose to Modify the Shared Web Part and in the Web Part Tool Pane, expand Query and change the Source settings to the site or list where you want to query the data from.

- Optionally update other settings to further refine the data view, such as Content Type and Filters. Select Apply.
- For more details, look and Steps 1 and 2 in the Configuring and Customizing the Content Query Web Part post.
Create the Custom Item Style
Now we have a rather boring view of some data. We use Item Styles to jazz up the formatting and selectively show various content, such as Title, Description and Body. There are already several Item Styles available out-of-the-box, but in my opinion, they have limited use. Go ahead and play around with what is available, there maybe something there that is perfect for your needs and it helps you to see what you can do with an Item Style. In the Tool Pane, expand Presentation and experiment with the drop down options under Styles. Select Apply to see the changes.
Before we style any content, we need to have the web part pull in the content we want to display. Some content is already pulled in by default, such as Title. For anything else that is not pulled by default, we need to tell the web part to get those fields. But how do we know which fields are already being pulled in? It is a bit of a chicken and the egg ordeal, so here are my suggested steps for working all of this information out:
Heads up! Here is where we deviate from the Configuring and Customizing the Content Query Web Part post.
- Open the site in SharePoint Designer (SPD). Navigate to Style Library, then XSL Style Sheets. Open ITEMSTYLE.XSL. Now doing this will customize (uhghost) the file! But we can always reset this back to the Site Definition and restore it to it's original state. Be sure to check out the file via SPD or the Site Content and Structure screen in the site.
- Take a minute to look at the file. Every time you see "<xsl:template..." that is the start of a new Item Style. There is one for each of the out-of-the-box Item Styles that show up in the Styles drop down in the Web Part Tool Pane. For every custom Item Style that is needed, a newxsl:template block will have to be created.
- Scroll down to the bottom of the file. Copy the last xsl:template code block and paste it above the closing xsl:stylesheet tag.
- Change the name and match properties in the Template tag to a unique name of your choice:
<xsl:template name="MyCustomStyle" match="Row[@Style='MyCustomStyle']" mode="itemstyle"> - Next we will add a little snippet of code within the Template tags that will render the names of the fields that are being passed. Note that this code will be temporary! We don't want to leave this in the finished Item Style.
<xsl:template name="MyCustomStyle" match="Row[@Style='MyCustomStyle']" mode="itemstyle">
<xsl:for-each select="@*">
P:<xsl:value-of select="name()" />
</xsl:for-each> - Save the file. Return to the site (in the browser) and refresh the page. Open the Web Part Tool Pane for the CQWP and expand Presentation, then under Styles change the Item Style to the new custom style in the drop down. Select Apply.
- The CQWP will now list out all of the fields that are being passed.

After each P: is the internal column name for each field that is being passed. These internal column names are what is referenced later in the code to display the data. For example:
<div class="description">
<xsl:value-of select="@Description" />
</div>
Description is the internal column name that is being wrapped and styled with a DIV tag and is the content that will display on the page. So we can look at the names displayed in the CQWP and see what data is already available for our use. For example, in this particular case we have Title, Author, Publishing Rollup Image and Publishing Date (PubDate).
Find the Additional Data
Our first goal was to determine what content is already being pulled into the web part. Now that we have done that, next we need to tell the web part to pull the other data we need. To do this we will need to get the internal column names for the necessary column(s) from the Content Type that is being used for the list.
- In the site, open Site Settings, then select Site Content Types. Locate the Content Type that the list is using. For example:
- If you are querying a site and showing pages, look under Page Layout Content Types.
- If you are querying a list, look under List Content Types.
- Select the Content Type name to view the Columns. Locate the column that needs to display in the custom item style. Locate the internal column name one of two ways:
- Way One: Click the column name. In the Change Site Content Type Column screen, hover over the Edit site column in new window link and note the URL that appears in the Status Bar. The internal column name appears after Field=. It also appears on the Site Content Type screen we just came from in the Status Bar, it is just inline with a lot of other characters. Often the string is too long in the Status Bar to display the Field property.

- Way Two: Right click the link and select Properties.

The URL listed in the General tab has the info we need, just hidden below the viewable area. Select the URL with your cursor, hit Ctrl + A to select the full URL, the copy and paste the URL into Notepad.
In the pasted URL in Notepad, locate Field=. The name that follows in the internal column name.
- Way One: Click the column name. In the Change Site Content Type Column screen, hover over the Edit site column in new window link and note the URL that appears in the Status Bar. The internal column name appears after Field=. It also appears on the Site Content Type screen we just came from in the Status Bar, it is just inline with a lot of other characters. Often the string is too long in the Status Bar to display the Field property.
Now that we have our internal column name, we can return to the instructions in the Configuring and Customizing the Content Query Web Part post and proceed with their Step 3.
Modify the CQWP to Include Additional Data
- In your site, in the CQWP, select Export from the web part's Edit menu. Save the .WEBPART file locally.
- Open the .WEBPART file in Notepad and search for "CommonViewFields". Replace the Property tag line of code with the code listed below, using your internal column name and the corresponding field type. It is very important that the field type listed is the correct type for the the data. If the field type is wrong, it won't break the site, but the Item Style won't display the content. Available values are:
- Text
- Note
- Number
- Currency
- Integer
- Boolean
- DateTime
- Threading
- Lookup
- Choice
- URL
- Counter
- DisplayOnly (DisplayOnly field type has no storage of its own)
- RichHTML
- Image
And I have either used or seen these used, but have not seen them documented anywhere:
Some field types are easy to figure out. If we are calling a date, use DateTime. For Title use Text, for body content use RichHTML. String together multiple entries with a semicolon between each pair: Name, RichHTML; Name2, Text.
<property name="CommonViewFields" type="string">InternalColumnNameGoesHere,FieldType</property>
For example: <property name="CommonViewFields" type="string">Comments, Note</property>
At the end of this article I cover how to find out the field type. - Save the file and import it back into the site. (Add a Web Part - Import - select the .WEBPART file -Upload - Drag and drop the web part onto the page).
Now we have two CQWPs on the page. We can remove the original one. We should also see the newly added internal column name(s) appear in the list of fields. Yay!! 18 steps later and now we are ready to style!! No, really, this process moves pretty fast. Now it is time to return to the XSL file and start making things pretty.
Style the Data in the Item Style
- Return to SharePoint Designer and your custom template in ITEMSTYLE.XSL.
- For every internal column name that has been included in the web part and needs to display in the Item Style, add it to the template using the xsl:value tag:
<xsl:value-of select="@InternalColumnNameGoesHere" />
For example: <xsl:value-of select="@Comments" /> - Wrap HTML around the tag to format the data.
Please note!! When the page renders the CQWP, the site grabs the Item Style for each line of data. So we can't add a table and expect that each line of data will be in a row. Instead we get a full table for each line of data. Keep this in mind as you style the HTML around the data. - Save the file, go to the site and refresh the page. The new styled content will appear.
- To remove markup tags, please refer to about the middle of Step 4 in the Configuring and Customizing the Content Query Web Part post.
- When done styling the Item Style, remove the code that lists the fields.
<xsl:for-each select="@*">
P:<xsl:value-of select="name()" />
</xsl:for-each>
My final template looks like this with stylings :
<xsl:template name="MyCustomStyle" match="Row[@Style='MyCustomStyle']" mode="itemstyle">
<div class="LinkToolTip" style="color:#D10B0C;font-weight:bold;">
<xsl:value-of select="@Title" />
<br/><br/><br/>
</div>
<div class="description">
<xsl:value-of select="@Body" disable-output-escaping="yes"/>
<br/><br/>
</div>
</xsl:template>
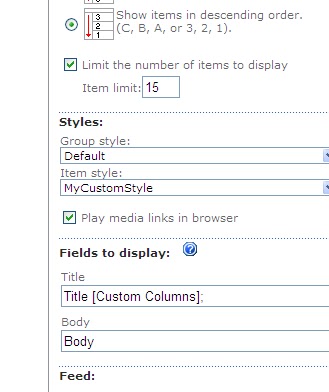
and the tool pane view looks like this
No comments:
Post a Comment